 For Windows
 For Mac
Quick Navigation
How to Record Apex Legends with iToolShare Screen Recorder
Windows 11/10/8/7

45-Day Money Back Guarantee
iToolShare Screen Recorder is highly preferred for capturing Apex Legends gameplay due to its outstanding audio and video quality. It offers rich editing features, extensive format support, and a user-friendly interface, making it a top choice for gamers.
Here's how to use it:
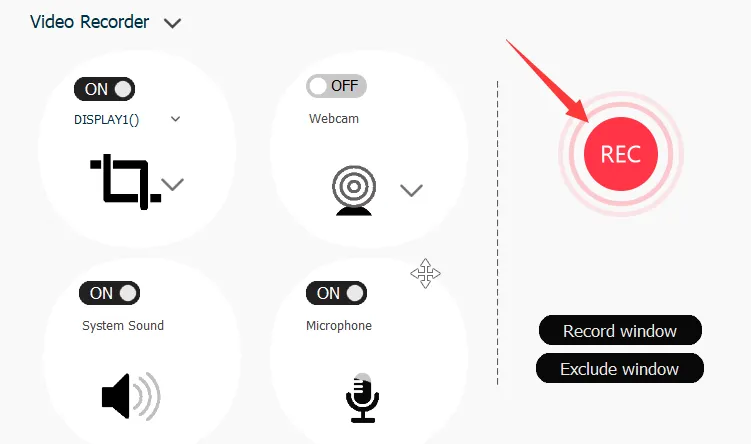
Step 1: Install and launch the iToolShare Screen Recorder program on your device.

Step 2: Select your preferred recording mode – whether full-screen or windowed – based on your preference.
Step 3: Initiate the recording process by clicking the start button and capture all the thrilling moments of your Apex Legends gameplay.
Pros
- Offers impeccable audio and video quality, ensuring high-definition recordings that showcase your gameplay in the best possible light.
- Easy to use, making it accessible for both novice and experienced users.
- Provides options for customization, such as choosing recording modes and adjusting quality settings.
Cons
- Free version has time limit.
How to Record Apex Legends with OBS (Open Broadcaster Software)
OBS is a popular choice for recording gameplay, thanks to its accessibility and versatility. Being free and open-source, it's accessible to all users, though it may require additional plugins or configurations for optimal performance.
Let's dive into the steps and considerations for recording Apex Legends using OBS.
Step 1: Launch OBS and set your Apex Legends game to Windowed or Borderless in the video settings.

Step 2: Check the "Preview Stream" to ensure that your Apex Legends gameplay is streaming to OBS. Adjust settings as needed.
Step 3: Start recording by clicking the "Start Recording" button. To stop, use your set hotkey.
Pros
- Free and open-source software, accessible to all users without any cost.
- Provides extensive customization options and support for plugins, allowing users to tailor their recording setup.
Cons
- May require additional plugins or configurations for optimal performance, which can be daunting for beginners.
How to Record Apex Legends with In-Game Camera Settings
If you're playing Apex Legends on Windows, you can take advantage of the built-in camera settings feature. While it requires no additional downloads or installations, it does have limited customization options compared to dedicated recording software.
To access and adjust your in-game camera settings, follow these steps:
Step 1: Open "Start" > "Settings" > "Gaming" and select "Captures."

Step 2: Make sure to select the "Record what happened" option.

Step 3: Customize the recording settings, including the maximum recording length and video frame rate.
Adjusting these settings allows you to tailor your in-game recordings to your preferences and capture the best moments from your gameplay.
Pros
- Built-in feature in Windows, requiring no additional downloads or installations.
- Simple to use, allowing users to start recording without additional setup.
Cons
- Limited customization options compared to dedicated recording software, such as iToolShare Screen Recorder.
How to Record Apex Legends with GeForce Experience
For users with Nvidia graphics cards, GeForce Experience offers seamless integration and easy recording options. However, it may impact in-game performance for some users, so be sure to test it out beforehand.
Here’s how to use GeForce Experience to record your Apex Legends gameplay:
Step 1: Start your Apex Legends game and hit the GeForce Experience hotkey (default is Alt + Z) to open the GeForce Experience overlay.

Step 2: In the overlay, you’ll see several options. To use Instant Replay, Nvidia ShadowPlay will record the last few minutes of gameplay when you hit a specific hotkey. Customize Instant Replay settings like recording length, video quality, resolution, frame rate, and bitrate to your preference.
Step 3: To manually record gameplay, click the "Record" option in the GeForce Experience overlay and start recording. You can also use the hotkey (default is Alt + F9) to begin recording without accessing the overlay.

Step 4: For capturing specific clips, use the hotkey (default is Alt + F10) to save the last few minutes of gameplay as a clip.
Step 5: GeForce Experience also allows you to stream your gameplay to platforms like Facebook, Twitch, and YouTube. Customize your broadcast settings in the 'Broadcast LIVE' section, and then start broadcasting by clicking 'Start' or using the hotkey (default is Alt + F8).
Step 6: Take screenshots during your gameplay with the hotkey (default is Alt + F1). For more advanced screenshot capabilities, use the 'Photo mode' option in the GeForce Experience overlay. In photo mode, you can add filters, upscale your screenshot, and even use Nvidia Ansel technology to reposition the camera for the best image possible.
GeForce Experience simplifies the recording process with intuitive hotkeys and user-friendly options. Whether you want to record long gameplay sessions, short highlight clips, or stream your gameplay, GeForce Experience offers versatile features to enhance your recording and streaming experience in Apex Legends.
Pros
- Integrates well with Nvidia graphics cards, ensuring smooth recording performance.
- Offers additional features such as instant replay and broadcasting capabilities.
Cons
- May potentially impact in-game performance for some users, especially those with lower-end hardware configurations.
How to Record Apex Legends with Xbox Game Bar
If you're playing Apex Legends on Windows 10, you can use the built-in Xbox Game Bar to capture gameplay. Like the in-game camera settings, it offers a simple and straightforward operation but has limited customization options compared to dedicated recording software.
To record Apex Legends gameplay using Xbox Game Bar, follow these steps:
Step 1: Click "Start" > "Settings" > "Gaming" to open the Settings dialog. Then, enable the "Game bar" option.

Step 2: Press Win + G to open the Game Bar and confirm that Apex Legends is recognized as a game.

Step 3: Start Apex Legends and click the red circle button to begin recording. You'll see a timer on your game window.
Step 4: To stop recording, click the "Stop" button. Your recordings will be saved in the Captures folder on your computer.
Pros
- Built-in feature in Windows 10, requiring no additional downloads or installations.
- Offers basic recording functionality for capturing gameplay clips.
Cons
- Limited customization options compared to dedicated recording software, such as iToolShare Screen Recorder.
How to Record Apex Legends Gameplay on Different Consoles
Console players can also record their Apex Legends gameplay directly from their gaming devices. While this method offers simplicity and ease of use, it's unable to provide features comparable to professional recording software.
Xbox:
Hold down the share button on your Xbox controller to start recording Apex Legends gameplay. Press the share button again to stop recording.

PlayStation:
Press the share button above the arrows twice to start recording Apex Legends gameplay on your PlayStation console. Press it again twice to stop recording.

Nintendo Switch:
On the Nintendo Switch console, press and hold the capture button on the left-hand controller to record Apex Legends gameplay. If using a regular Nintendo Switch controller, the capture button is located on the left side, above the arrows.

Pros
- Offers a simple and straightforward operation for recording gameplay.
- Built-in functionality allows users to start recording with ease.
Cons
- Unable to provide features comparable to professional recording software, such as advanced editing tools or customizable settings.
With these top tools and methods at your disposal, you can effortlessly record and share your Apex Legends gameplay moments, ensuring you never miss a chance to capture the excitement of the battlefield. Whether you prefer the simplicity of in-game recording options or the advanced features of dedicated recording software, there's a solution to suit every player's needs.


