Quick Navigation
- Step 1: Open iToolShare Screen Recorder
- Step 2: Configure Recording Settings
- Step 3: Start Recording
- Step 4: Stop Recording
Step 1. Open iToolShare Screen Recorder
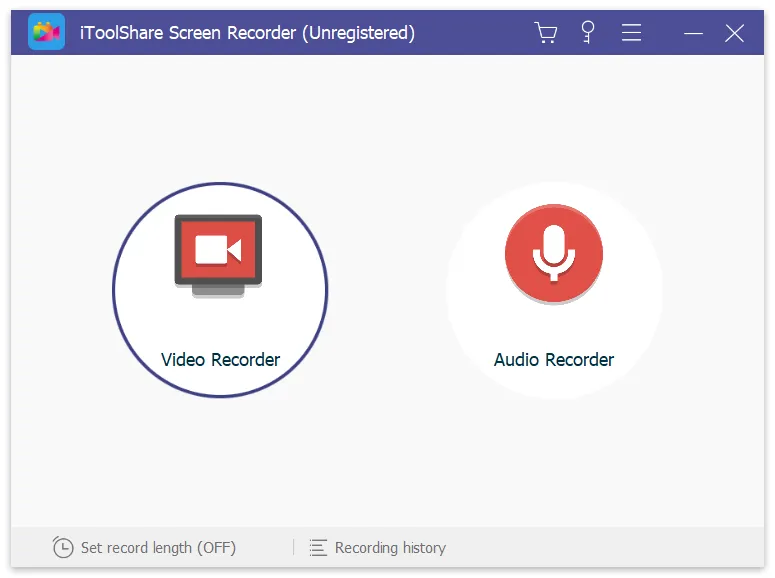
After installing iToolShare Screen Recorder on your computer, launch the program. The intuitive screen recorder dashboard will appear on your desktop, ready for action.
Step 2: Configure Recording Settings
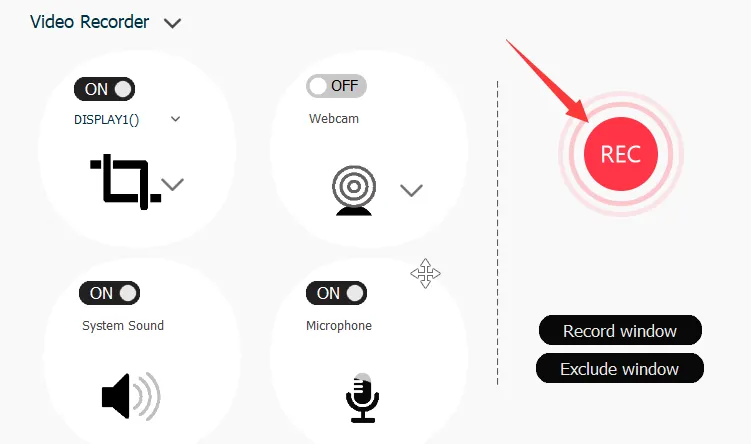
Within the iToolShare Screen Recorder interface, select the "Record Area" option. Use your mouse to drag and select the area of the Disney+ playback window. You can also customize recording settings such as audio input and quality to suit your preferences.
Step 3: Start Recording
Now, click the "Start Record" button to initiate the recording process. Begin playing the desired content on Disney+ while iToolShare Screen Recorder captures every moment seamlessly.
Step 4: Stop Recording
Once you've finished recording, click the "Stop Record" button. Your recorded Disney+ show will be automatically saved to your specified location on your computer.
Solve Black Screen Issue when Recording Disney+ Video in Browser
When streaming videos on platforms like Disney+ Video through a web browser, Digital Rights Management (DRM) protection is often employed to prevent unauthorized copying or recording. As a result, attempting to take screenshots or record content may result in a black screen. However, this issue can be resolved by adjusting settings in the browser. In this article, we'll guide you through the steps to fix the black screen problem when recording Disney+ Video using the Firefox browser as an example:
If you're experiencing a black screen issue in other scenarios, please visit our support page for a comprehensive guide to resolving all black screen problems: Fix Black Screen Issue When Recording Videos
1.Access Browser Settings
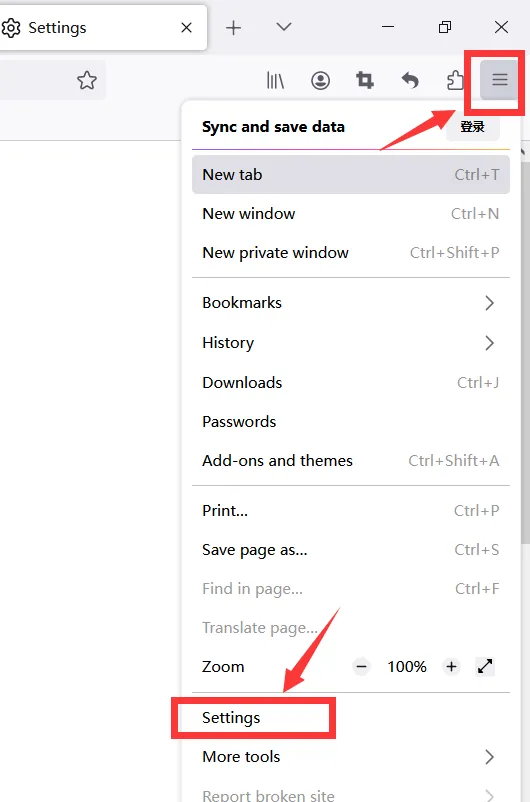
First, open the Firefox browser on your computer or device. Then, click on the Menu icon located in the top-right corner of the browser window. From the dropdown menu, select "Options" or "Settings" to access the browser settings.
2.Disable Hardware Acceleration
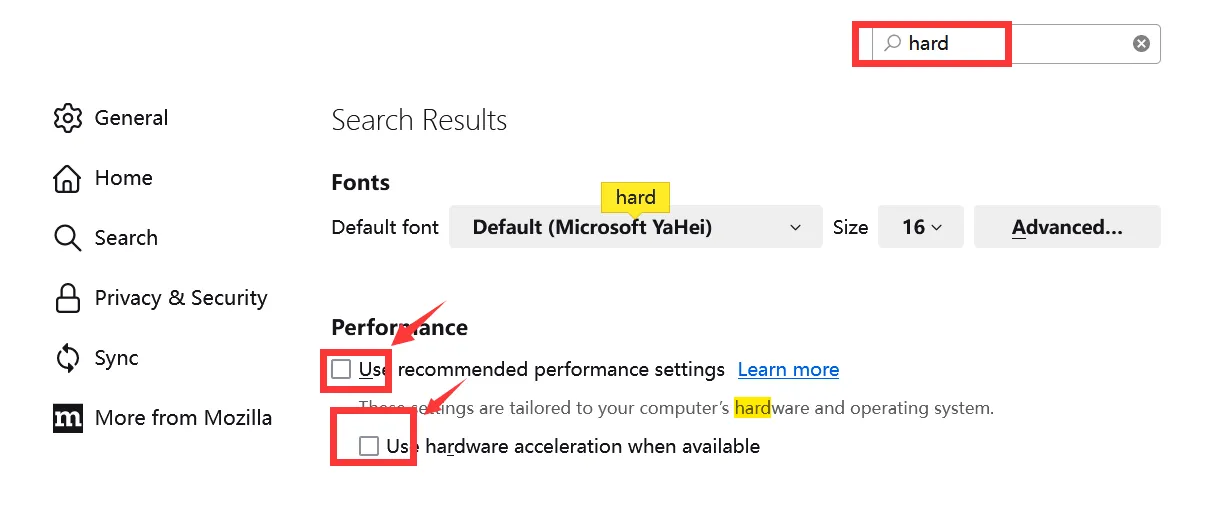
In the Firefox settings interface, navigate to the "General" tab. Within the "Performance" section, you'll find an option labeled "Use hardware acceleration when available". Make sure to uncheck this option.
3.Restart the Browser and Start Recording Disney+ Video
After disabling hardware acceleration, close and reopen the Firefox browser to apply the changes. Once the browser is restarted, visit the Disney+ Video website and start playing the video you wish to record. You should now be able to use a screen recording tool to capture the video content without encountering the black screen issue.
By following these simple steps to adjust the browser settings, you can effectively resolve the black screen problem when recording Disney+ Video in the Firefox browser. With the issue resolved, you can enjoy seamless recording of your favorite Disney+ Video content and enhance your viewing experience.
How to Screen Record Disney+ Shows on iPhone
Capturing your favorite Disney+ Video shows on your iPhone has never been easier, thanks to the built-in screen recording feature. This tutorial will guide you through the simple steps to record Disney+ shows effortlessly on your iPhone or iPad using the default screen recorder.
Step 1: Stream Your Desired Video: Begin by streaming the Disney+ Video you wish to record on your iPhone or iPad.
Step 2: Launch Control Center: Scroll down from the top-right corner of your screen to access the Control Center. This can be done by swiping down from the upper-right corner on newer iPhone models or swiping up from the bottom of the screen on older models.
Step 3: Tap on Screen Recording: In the Control Center, locate and tap on the Screen Recording button. You'll notice a countdown of 3 seconds before the screen recording begins.
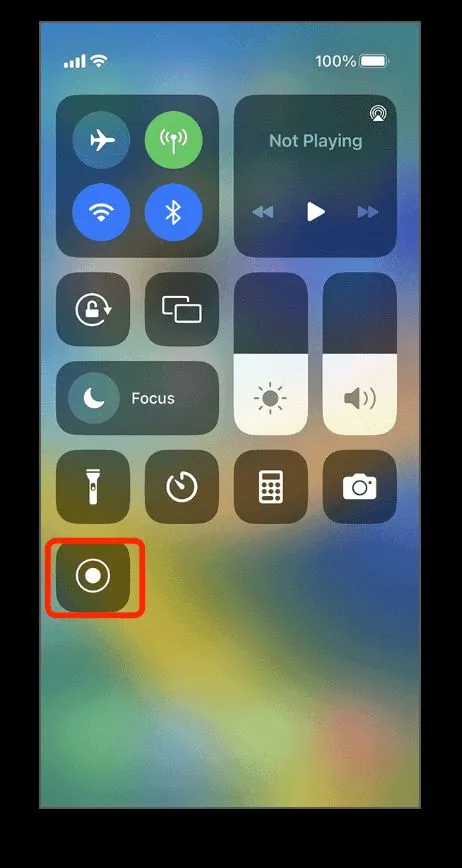
Step 4: Record the Video: Return to the Disney+ Video and start streaming the content you want to record while the screen recording is active.
Step 5: Stop and Save Recording: When the video is finished, tap the red recording icon in the status bar or go back to the Control Center and tap the Screen Recording button again. Choose "Stop" when prompted to stop the recording, and the captured video will be automatically saved to your Photos app.
How to Screen Record Disney+ Videos on Android
Bringing flexibility to your streaming experience, screen recording Disney+ videos on your Android device allows you to capture and relive your favorite content at your convenience. While the steps may vary across Android models, this guide provides a general example to help you seamlessly screen record Disney+ videos on your Android device.
Step 1: Adjust Screen Recording Quality (Optional): Before initiating the screen recording process, you may have the option to adjust the screen recording quality in your device's settings. This step could be optional and might vary depending on your Android model.
Step 2: Play the Desired Video on Disney+ : Launch the Disney+ app on your Android device and play the video you wish to record.
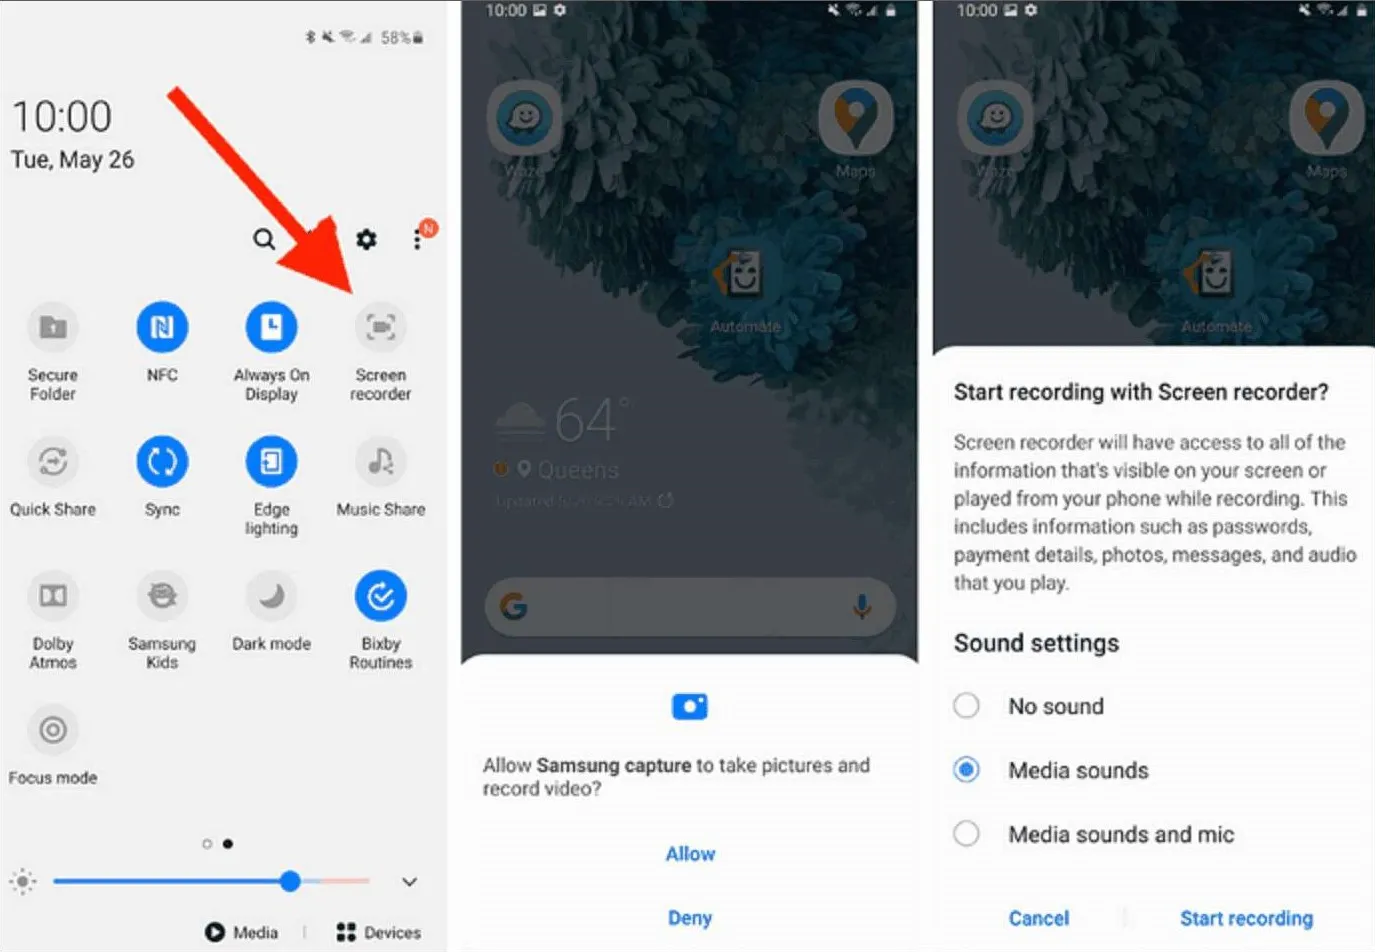
Step 3: Access Screen Recorder Settings: Swipe down from the top of your screen to access the quick settings menu. Locate and tap on the "Screen Recorder" option to enable it. Please note that the placement and availability of this option may vary based on your Android model.
Step 4: Start Recording: Once the screen recorder is activated, tap on "Start recording." Return to the Disney+ app and play the video while the screen recording is in progress.
Step 5: Stop and Save Recording: When you've captured the desired content, access the screen recorder settings again. Tap on "Stop recording" to conclude the screen recording process. The recorded video will be automatically saved in your device's Gallery or a designated folder.
Enjoy Your Disney+ Content Anytime, Anywhere
With iToolShare Screen Recorder, you can enjoy your favorite Disney+ shows and movies offline, without worrying about an internet connection. Simply open the saved recording file whenever you want to relive the magic of Disney+.
Experience the convenience and quality of iToolShare Screen Recorder and elevate your Disney+ viewing experience today!
 For Windows
 For Mac


