 For Windows
 For Mac
Quick Navigation
Solve Black Screen Issue when Screen Record Protected Videos in Firefox
1.Access Browser Settings
Open the Firefox browser on your computer or device.
Click on the Menu icon (three horizontal lines) located in the top-right corner of the browser window.
From the dropdown menu, select "Options" or "Settings" to access the browser settings.

2.Disable Hardware Acceleration
In the Firefox settings interface, navigate to the "General" tab.
Scroll down to the "Performance" section.
Uncheck the option labeled "Use hardware acceleration when available".

3.Restart the Browser and Start Recording
After disabling hardware acceleration, close the Firefox browser and reopen it to apply the changes.
Once the browser is restarted, visit the video streaming website and start playing the video you wish to record.
Solve Black Screen Issue when Screen Record Protected Videos in Google Chrome
1.Access Browser Settings
Open the Google Chrome browser on your computer or device.
Click on the menu icon (three vertical dots) located in the top-right corner of the browser window.
From the dropdown menu, select "Settings" to access the browser settings.

2.Disable Hardware Acceleration
In the Chrome settings interface, scroll down and click on "Advanced" to expand additional settings options.
Under the "System" section, toggle off the option labeled "Use hardware acceleration when available".
3.Restart the Browser and Start Recording
After disabling hardware acceleration, close the Chrome browser and reopen it to apply the changes.
Once the browser is restarted, visit the video streaming website and begin playing the video you wish to record.
Solve Black Screen Issue when Screen Record Protected Videos in Microsoft Edge
1.Access Browser Settings
Launch the Microsoft Edge web browser on your device.
Click on the three-dot menu icon in the upper-right corner of the browser to open the More Options menu.
From the More Options menu, select Settings.

2.Disable Hardware Acceleration
In the Settings panel, scroll down and find the System and Performance section. Click on it to access the related settings.
Under the System and Performance section, locate the option that says 'Use hardware acceleration when available' and turn it off by toggling the switch.

3.Restart the Browser and Start Recording
Once you have disabled hardware acceleration, close and reopen Microsoft Edge for the changes to take effect.
Other Methods to Solve Black Screen Issues
If you are not watching videos in a web browser, you can try other methods to solve this problem. Typically, popular video streaming websites have their own applications, where users watch videos. You can go to the settings interface of the application, find the hardware acceleration option, and disable it.
If other methods have not resolved the issue, disabling the graphics card on your PC may offer a solution. Follow these steps:
1.Navigate to Device Manager
Click on the "Start" icon on your desktop and type "Device Manager" in the search bar. Select the Device Manager option from the search results.

2.Expand Display Adapters
In the Device Manager window, double-click on the "Display Adapters" category to expand the options.
3.Disable Graphics Card
Right-click on your graphics card listed under Display Adapters, and select the "Disable Device" option from the context menu.
4.Confirm Disable
A pop-up window will appear asking for confirmation. Click "Yes" to disable the graphics card.
Steps: How to Record Protected Videos with iToolshare
Provide a detailed walkthrough of the steps to record Protected Videos using iToolshare in a concise and straightforward manner:
- Step 1. Open iToolShare Screen Recorder
- Step 2. Adjust the recording area to capture only the Protected Video playback window.
- Step 3. Click the "Start Record" button to begin recording Protected Videos.
- Step 4. Play the movie or show you want to record.
- Step 5. Click the "Stop Record" button to end the recording process.
Step 1. Open iToolShare Screen Recorder
Windows 11/10/8/7

45-Day Money Back Guarantee
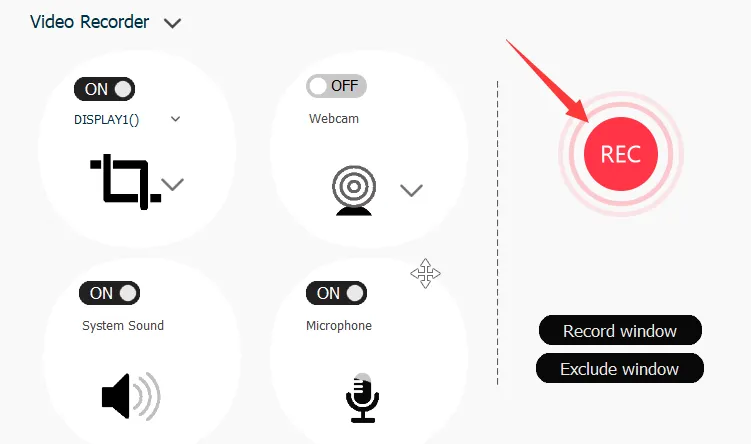
Once you’ve installed the program and opened it on your computer, the screen recorder dashboard will pop up on your desktop:

The iToolShare interface is rather intuitive, so you will be able to figure it out even if you are a complete non-techie.
Step 2. Adjust the recording area to capture only the Protected Video playback window.
You have two options
Option A: to record an area of the screen, choose the 'Select a recording area' or 'Rectangle on a screen' menu.
Option B: alternatively, to record the entire screen, select 'Fullscreen' on the dropdown menu and choose your monitor.
Step 3. Click the "Start Record" button to begin recording Protected Video.
Step 4. Play the movie or show you want to record.
Step 5. Click the "Stop Record" button to end the recording process.
Conclusion
The process of recording Protected Videos with iToolshare is simple and efficient. By following the steps and tips outlined in this article, you can easily record high-quality Protected Video content for convenient offline enjoyment. Download iToolshare screen recording software now and embark on your recording journey!


