 For Windows
 For Mac
Quick Navigation
Step-by-Step Guide: How to Record Paramount Plus in HD
iToolshare is a user-friendly screen recording software that allows you to capture high-definition video and audio content. With its intuitive interface and versatile features, iToolshare makes it easy to record Paramount Plus streaming content and save it as a playback-ready video file.
Windows 11/10/8/7

45-Day Money Back Guarantee
Step 1. Select the Video Recorder feature in iToolshare and set the recording area.

Step 2. Open Paramount Plus and play the content you wish to record.

Step 3. Click the record button to start recording Paramount Plus video.
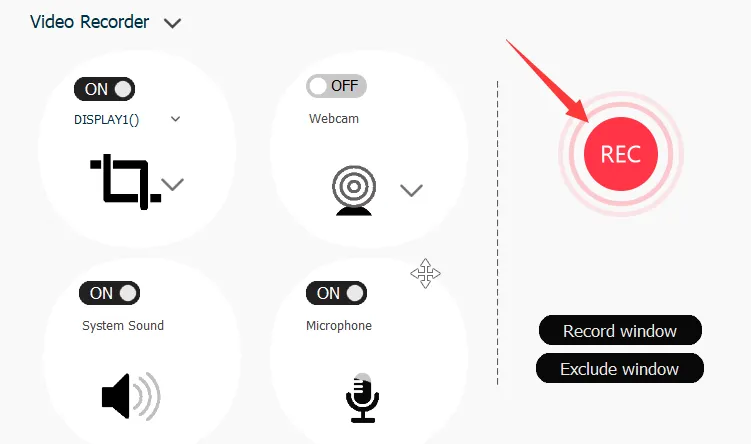
Step 4. When you're done with the recording, stop the recording and save the recorded video file.
Next Steps: Editing and Sharing the Recorded Video
Once you have finished recording Paramount Plus content, iToolshare offers simple video editing tools that allow you to trim, adjust visuals, and even add watermarks and subtitles. You can also export the recorded video in different formats and share it with friends, family, or on social media.
Solve Black Screen Issue when Recording Paramount Plus in Browser
When streaming videos on platforms like Paramount Plus through a web browser, Digital Rights Management (DRM) protection is often employed to prevent unauthorized copying or recording. As a result, attempting to take screenshots or record content may result in a black screen. However, this issue can be resolved by adjusting settings in the browser. In this article, we'll guide you through the steps to fix the black screen problem when recording Paramount Plus using the Firefox browser as an example:
If you're experiencing a black screen issue in other scenarios, please visit our support page for a comprehensive guide to resolving all black screen problems: Fix Black Screen Issue When Recording Videos
1.Access Browser Settings
First, open the Firefox browser on your computer or device. Then, click on the Menu icon located in the top-right corner of the browser window. From the dropdown menu, select "Options" or "Settings" to access the browser settings.

2.Disable Hardware Acceleration
In the Firefox settings interface, navigate to the "General" tab. Within the "Performance" section, you'll find an option labeled "Use hardware acceleration when available". Make sure to uncheck this option.

3.Restart the Browser and Start Recording Paramount Plus
After disabling hardware acceleration, Close and then Reopen the Firefox browser to apply the changes. Once the browser is restarted, visit the Paramount Plus website and start playing the video you wish to record. You should now be able to use a screen recording tool to capture the video content without encountering the black screen issue.
By following these simple steps to adjust the browser settings, you can effectively resolve the black screen problem when recording Paramount Plus in the Firefox browser. With the issue resolved, you can enjoy seamless recording of your favorite Paramount Plus content and enhance your viewing experience.
Conclusion
With iToolshare screen recording software, you can effortlessly capture Paramount Plus in high definition, enabling you to revisit and share your favorite shows and movies. Whether you want to preserve a classic film or document an exciting episode, iToolshare is a practical tool to have. Enjoy the content provided by Paramount Plus and create lasting memories with iToolshare.
How to Screen Record Paramount Plus Shows on iPhone
Capturing your favorite Paramount Plus Video shows on your iPhone has never been easier, thanks to the built-in screen recording feature. This tutorial will guide you through the simple steps to record Paramount Plus shows effortlessly on your iPhone or iPad using the default screen recorder.
Step 1: Stream Your Desired Video: Begin by streaming the Paramount Plus Video you wish to record on your iPhone or iPad.
Step 2: Launch Control Center: Scroll down from the top-right corner of your screen to access the Control Center. This can be done by swiping down from the upper-right corner on newer iPhone models or swiping up from the bottom of the screen on older models.
Step 3: Tap on Screen Recording: In the Control Center, locate and tap on the Screen Recording button. You'll notice a countdown of 3 seconds before the screen recording begins.

Step 4: Record the Video: Return to the Paramount Plus Video and start streaming the content you want to record while the screen recording is active.
Step 5: Stop and Save Recording: When the video is finished, tap the red recording icon in the status bar or go back to the Control Center and tap the Screen Recording button again. Choose "Stop" when prompted to stop the recording, and the captured video will be automatically saved to your Photos app.
How to Screen Record Paramount Plus Videos on Android
Bringing flexibility to your streaming experience, screen recording Paramount Plus videos on your Android device allows you to capture and relive your favorite content at your convenience. While the steps may vary across Android models, this guide provides a general example to help you seamlessly screen record Paramount Plus videos on your Android device.
Step 1: Adjust Screen Recording Quality (Optional): Before initiating the screen recording process, you may have the option to adjust the screen recording quality in your device's settings. This step could be optional and might vary depending on your Android model.
Step 2: Play the Desired Video on Paramount Plus: Launch the Paramount Plus app on your Android device and play the video you wish to record.
Step 3: Access Screen Recorder Settings: Swipe down from the top of your screen to access the quick settings menu. Locate and tap on the "Screen Recorder" option to enable it. Please note that the placement and availability of this option may vary based on your Android model.
Step 4: Start Recording: Once the screen recorder is activated, tap on "Start recording." Return to the Paramount Plus app and play the video while the screen recording is in progress.
Step 5: Stop and Save Recording: When you've captured the desired content, access the screen recorder settings again. Tap on "Stop recording" to conclude the screen recording process. The recorded video will be automatically saved in your device's Gallery or a designated folder.

Other Software Options for Recording Paramount+
Bandicam: A Versatile Solution for High-Quality Recording
Bandicam stands out as a reliable and feature-rich screen recording software that supports capturing videos from popular streaming services, including Paramount Plus, Netflix, and Hulu. Follow these simple steps to start recording on Paramount+ using Bandicam:
1.Download and Install: Begin by downloading and installing Bandicam on your PC. Launch the software after installation.
2.Select Recording Mode: Choose the Fullscreen mode to capture videos on Paramount Plus.
3.Initiate Recording: Play the video you want to capture, then click REC or use the F12 hotkey to start and stop recording. It's that easy!

Screencast-O-Matic: User-Friendly Recording for All Devices
Screencast-O-Matic is a powerful and user-friendly screen recorder that caters to both beginners and experienced users. Whether you're recording on a computer, tablet, smartphone, or gaming console, this software has you covered. Follow the user guide below to start recording on Paramount+ with Screencast-O-Matic:
1.Access the Tool: Visit the official Screencast-O-Matic webpage and launch the free recorder or create a new account for additional features.
2.Select Recording Area: Drag and extend the recording area on your screen. You can choose to include your webcam for a picture-in-picture effect.
3.Start Recording: Click the "Rec" button to begin recording. Use the "Pause" button to halt temporarily and resume with the same button. Click "Pause/stop" to end the recording.
4.Preview and Save: After recording, preview your content and choose to save it locally or upload it to platforms like YouTube.


