 For Windows
 For Mac
In this short guide, we’ll show you how to Record meeting on PC. You can download the latest version of the software from the official developer’s website.
Step 1. Open iToolShare Screen Recorder
Windows 11/10/8/7

45-Day Money Back Guarantee
Once you’ve installed the program and opened it on your computer, the screen recorder dashboard will pop up on your desktop:

The iToolShare interface is rather intuitive, so you will be able to figure it out even if you are a complete non-techie.
Step 2. Select Video Recorder and adjust the recording area

You have two options
Option A: to record an area of the screen, choose the 'Select a recording area' or 'Rectangle on a screen' menu.
Option B: alternatively, to record the entire screen, select 'Fullscreen' on the dropdown menu and choose your monitor.
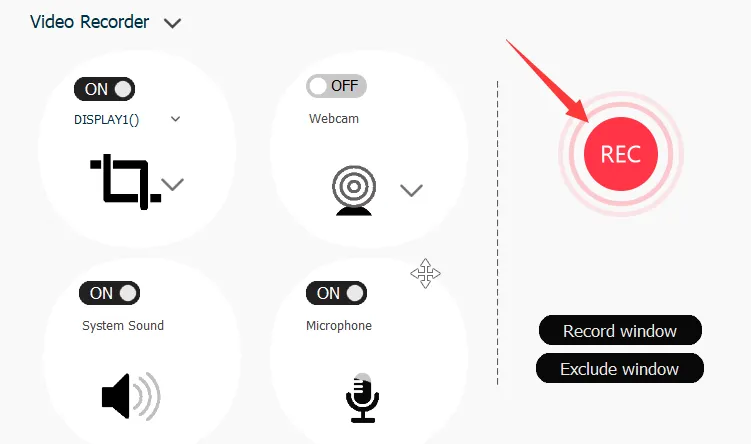
Step 3. Record meeting
Click the Rec icon on the recording panel to start capturing the video. If the Show countdown option is enabled, the recording will start after the countdown. Otherwise, it'll begin right away.
Why Choose iToolShare to Record meeting
Seamless Integration with Online Meeting Platforms: iToolShare Screen Recorder is specifically designed to seamlessly integrate with various online meeting platforms, such as Zoom, Microsoft Teams, and Google Meet. It ensures smooth recording without disrupting the meeting experience.
High-Quality Recording: iToolShare Screen Recorder guarantees high-quality video and audio recording of online meetings. You can capture presentations, discussions, and interactions with exceptional clarity.
Customizable Recording Options: With iToolShare Screen Recorder, you can customize recording settings to suit your specific meeting requirements. Adjust frame rates, select screen regions, and choose output formats for optimal results.
Secure and Legal Recording: iToolShare Screen Recorder ensures secure and legal recording of online meetings. It is designed for personal use only, respecting the privacy and copyright of meeting participants.
Ad-Free and Watermark-Free Recordings: Enjoy ad-free and watermark-free recordings of online meetings with iToolShare Screen Recorder, ensuring distraction-free playback.
Choosing iToolShare Screen Recorder guarantees a seamless and professional recording experience for your online meetings. Its versatility, high-quality recording, and commitment to privacy make it the ideal choice for preserving valuable meeting content. Record and revisit your online meetings with confidence using iToolShare Screen Recorder.
- 1) Zoom
- 2) Cisco Webex Meetings
- 3) Microsoft Teams or Skype
- 4) Google Meet or Hangouts
- 5) GoToMeeting
- 6) BlueJeans
- 7) Slack video calls
How to Record Zoom Meetings On Your Laptop
Once you have the Zoom app installed, open it and sign in with your account. Then, join the meeting that you want to record.
When you’re in the meeting, click the “Record” button at the bottom of the screen.
A new window will pop up asking you where you want to save the recorded file. Choose a location and then click “Start Recording.”
The recording will start automatically and will be saved to the chosen location when you stop it.
To stop the recording, click the “Stop Recording” button at the bottom of the screen.
How to Record Webex Meetings On Your Laptop
Open Webex and log in with your username and password.
Click on the Record button
Choose Record on my computer from the popup or Record in the cloud.
Click the red Record button in the popup window.
How to Record Microsoft Teams Meetings On Your Laptop
Start or join the meeting.
Go to the meeting controls and select More actions. > Start recording. Everyone in the meeting gets notified that recording and transcription have started. Notes: You can't make multiple recordings of the same meeting at the same time.
How to Record Google Meet Meetings On Your Laptop
Start or Join a meeting in Google Meet.
At the bottom right, click Activities. Recording.
Click Start recording.
In the window that opens, click Start.
Wait for the recording to start.
To stop a recording, click Activities Recording.
In the window that opens, click Stop recording.
How to Record GoToMeeting Meetings On Your Laptop
Once you have started your GoTo Meeting session, do the following: Windows: At the bottom of your Control Panel, click Record this meeting or Record. Mac: At the bottom of the Screen Sharing pane, click Record.
How to Record BlueJeans Meetings On Your Laptop
As a Moderator, click on the "Start Rec" button (near the top left-hand corner) to start recording.
While Recording is active, a blinking red icon will be visible in the top left-hand corner.
Moderators can click on the recording button again to Stop Recording.
How to Record Slack video calls On Your Laptop
Download the Slack app on the desktop. Then, join or start a call.
Tap the camera icon and hit "Record". Meanwhile, you are allowed to share the screen with others, etc.
Once you have finished recording, tap "Stop Recording".


