-
Video Converter
 For Windows
- Video Converter Ultimate

 For Mac
-
Multimedia
- For Mac
-
Utility
- For Windows
- Video Downloader
- For Mac
 For Windows
 For MacFor MacFor WindowsFor Mac
In the modern era of virtual meetings, Amazon Chime has become an essential platform for seamless collaboration. But what if you need to keep a record of those important Chime meetings for reference or sharing? Enter iToolShare Screen Recorder – your ultimate solution for capturing Amazon Chime meetings with impeccable video and audio quality. In this step-by-step guide, we'll walk you through the process of recording Amazon Chime meetings effortlessly.

iToolShare Screen Recorder stands out as a top-notch screen recording tool that guarantees lossless video and audio capture. Its user-friendly interface and powerful features make it an ideal choice for preserving your Amazon Chime meeting content. Here's how to get started:
Windows 11/10/8/7

45-Day Money Back Guarantee
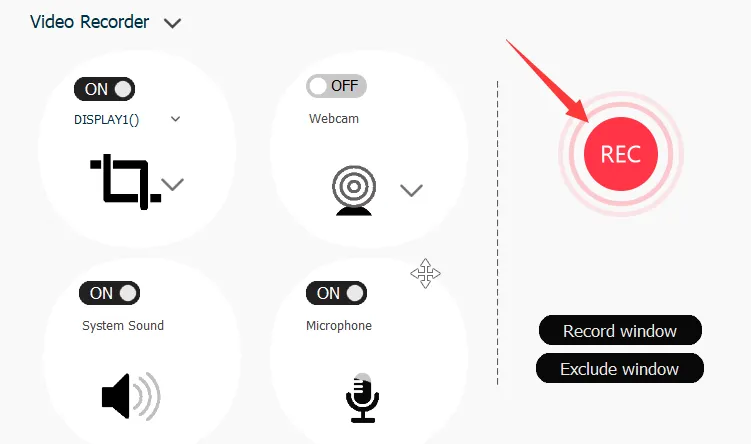
Start by downloading and installing iToolShare Screen Recorder from the official website. The tool is compatible with Windows, ensuring a seamless experience for users across different platforms.


Once installed, launch the software and configure your recording settings. You can choose to capture the entire screen, a specific application window, or a custom region that includes the Amazon Chime meeting interface.
Ensure that the audio source is set to capture system audio so that the meeting audio is recorded along with the video. This ensures a comprehensive recording that captures both visual and auditory aspects of the Amazon Chime meeting.
With your settings in place, start the recording by clicking the "Record" button. Navigate to your Amazon Chime meeting and participate as usual. iToolShare Screen Recorder will capture every detail in high-quality video and audio.
Once your Amazon Chime meeting concludes, click the "Stop" button in iToolShare Screen Recorder. You'll then be prompted to save the recording. Choose a destination and select the desired output format for your recording.
Your recorded Amazon Chime meeting will be readily available for playback and sharing. You can review the meeting content, extract important information, or share it with colleagues who may have missed the session.
Amazon Chime is a powerful platform for virtual meetings and collaboration. Did you know that you can also record your Amazon Chime meetings for future reference or sharing? In this guide, we'll walk you through the steps to effectively use Amazon Chime to record your important meetings.
Log in to your Amazon Chime account and schedule or start a meeting as you normally would. Ensure that all participants are present and ready for the session.

Once the meeting has commenced, locate the "More options" button represented by three dots (usually "...") on the Chime interface. Click on it to open a dropdown menu. From the options, select "Start recording." A notification will alert all participants that the meeting is being recorded.
Proceed with your meeting as usual. Amazon Chime will capture both video and audio content from the meeting. This includes presentations, discussions, screen sharing, and any other visual or auditory elements.
Once your meeting has concluded, click the "End" button to wrap up the session. Simultaneously, Amazon Chime will stop the recording automatically. Keep in mind that participants will be notified when the recording stops.
Amazon Chime will process the recording, and it will be available in your Amazon Chime account shortly after the meeting ends. Access the recording by navigating to your Amazon Chime dashboard or the specific meeting history.

With the recording available, you can share it with participants who attended the meeting or those who couldn't make it. You have the option to download the recording and distribute it as needed.
Privacy and Consent:Before recording any meeting, ensure that all participants are aware that the session is being recorded. Respect the privacy and preferences of everyone involved.
Storage:Amazon Chime recordings are stored in your account for a specific period of time, depending on your subscription plan. Make sure to save or share the recording within this timeframe.
Recording Notifications:Amazon Chime will display notifications to participants when recording starts and stops. This transparency helps maintain a respectful and professional atmosphere during the meeting.
Why does my amazon chime recording audio sync gradually drift over time?
What is the smallest video format for amazon chime without losing quality?
Does recording amazon chime on a single PC cause significant FPS drops?
Does HDR gameplay display correctly when capturing amazon chime?
Can this software bypass Discord audio and solely record amazon chime?
Why do I get a black screen when capturing amazon chime via OBS or Game Capture?
Is it possible to capture retro resolutions or stretched aspects for amazon chime?
How do I fix stuttering playback in my amazon chime recordings?

Tim - iToolShare Senior Screen Recording & Broadcasting Specialist
With over 10 years of hands-on experience in game streaming, video capture optimization, and broadcast testing, Tim has evaluated dozens of screen recorders, OBS plugins, and streaming software.
He rigorously tests recording latency and CPU/GPU overhead on a high-end Windows 11 gaming rig, ensuring smooth 4K/8K 120fps recording with zero frame drops during heavy gameplay.


